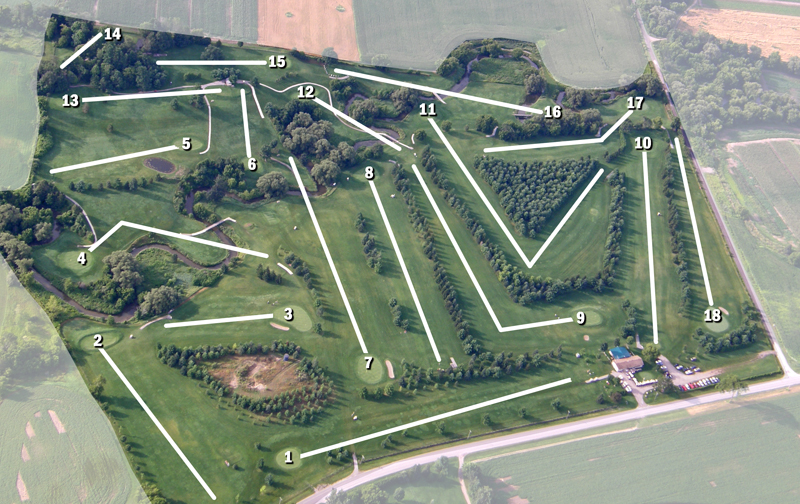
Course Layout
Hole
Par
Distance
Playing Tip
1
4
- White – 300
- Red – 215
Play your tee shot to the centre-right of the fairway to allow for an open second shot to the green. Keep your approach shot below the pin on this elevated green.
2
3
- White: 205
- Red: 160
This exciting drivable green offers a great birdie opportunity, but accuracy is key. A well-struck tee shot can roll nicely toward the slightly elevated green, however golfers should be cautious of the creek located directly behind the putting surface. Once your group has completed the hole and is proceeding to the next tee, please ring the bell to let the golfers behind you know the fairway is clear.
3
3
- White: 120
- Red: 90
This hole demands a precise approach shot and careful attention to pin placement. Whenever possible, try to leave your ball below and slightly right of the pin to improve your putting angle. With its elevated green and subtle back-to-front slope, the putting surface can be more deceptive than it first appears, making distance control especially important.
4
4
- White: 250
- Red: 200
A conservative tee shot aimed toward the fairway marker provides the safest route and sets up a comfortable approach into the hole. For golfers looking to be more aggressive, an accurate drive cutting the corner on this dog-leg left can create an exciting birdie — or even eagle — opportunity. Smart course management and shot placement are key on this risk-and-reward hole.
5
3
- White: 155
- Red: 135
Avoid the pond — this hole rewards patience and accuracy over power. Take your time off the tee and focus on solid shot placement. Golfers can also use the natural hillside to the left of the green to help guide or bounce their ball toward the putting surface for an added strategic advantage.
6
3
- White: 115
- Red: 80
This hole is best played with strategy and touch rather than trying to attack the pin directly through the air. Unless you’re able to stop your tee shot quickly on the green, use the natural slope and let the ball roll down toward the putting surface. Aiming approximately 10 yards to the right of the green and allowing your ball to first land about 40 yards short can create a smooth run-up approach that may leave you within 10–20 feet of the pin.
7
4
- White: 300
- Red: 220
A strong and accurate drive on this hole can leave golfers with only a short wedge into the green, creating an excellent scoring opportunity. However, don’t let the approach shot fool you — the large putting surface can make distance control challenging, so pay close attention to your first putt to avoid a potential three-putt.
8
4
- White: 265
- Red: 225
With a favourable tailwind, longer hitters may have an opportunity to reach the green off the tee. Accuracy and distance control are important, however, as the creek sits just a few yards behind the slightly elevated green. Be careful not to overhit your approach or tee shot, as anything long can quickly find trouble.
9
4
- White: 345
- Red: 310
Accuracy off the tee is essential on this dog-leg left hole, with out-of-bounds running along the left side from the tee box to the corner of the fairway. A straight and well-positioned drive will leave golfers with an open and manageable approach shot into the green. When attacking the green, avoid coming up short, as the steep elevation at the front can make saving par difficult. For the best scoring opportunity, aim your approach toward the middle or back portion of the green.
OUT
32
- White: 2,055
- Red: 1,635
Before heading to the 10th tee, take a moment to relax and recharge at the clubhouse with a selection of quick snacks and refreshing cold beverages. On weekends, golfers can also enjoy the convenience of beverage cart service available throughout the course.
10
4
- White: 311
- Red: 281
A long and accurate drive on this hole can set up a short and favourable second shot into the green. For the best results on your approach, try landing the ball approximately 15 yards short of the green and allow the natural contours to help it roll smoothly toward the flag.
11
5
- White: 473
- Red: 375
Accuracy off the tee is important on this hole, with out-of-bounds running along the right side until the fairway bends. Aiming your drive toward the white fairway marker will set up the best angle for your next shot. Longer hitters may have an opportunity to reach the green in two, but caution is required on the approach, as the slightly elevated green is protected by a river located just a few yards beyond the back edge.
12
3
- White: 120
- Red: 75
Positioning your tee shot below the flag will greatly improve your chances of making an easy par on this hole. While the green is relatively shallow from front to back, it is quite wide and features a noticeable slope toward the front, making distance control and proper placement especially important.
13
3
- White: 150
- Red: 110
This challenging green places a premium on accuracy and smart shot placement. Whenever possible, try to leave your ball below the hole to set up a more manageable putt. Off the tee, avoid missing left of the green, as doing so can leave you with a difficult blind recovery shot back toward the putting surface.
14
3
- White: 70
- Red: 70
A controlled bump-and-run approach can often be the safest and most effective play on this hole. Pay close attention to pin placement, especially when the flag is positioned toward the back or left tier of the green. Avoid leaving your ball in the lower right section, as it can create a difficult and challenging putt to certain hole locations.
15
3
- White: 135
- Red: 115
This green is very reachable for many golfers, making it an excellent scoring opportunity. While attacking the green can pay off, be mindful of the out-of-bounds running along the left side of the hole, as an overly aggressive shot can quickly turn into trouble.
16
4
- White: 245
- Red: 131
Long hitters have an exciting risk-and-reward opportunity off the tee on this hole. For golfers choosing a more conservative approach, a controlled shot placed safely between the two creeks will set up a short and manageable second shot into the green. Accuracy becomes especially important near the putting surface, as the green is closely protected by the surrounding creek.
17
4
- White: 260
- Red: 225
A tee shot aimed toward the white fairway marker will provide the safest and most direct approach into the green below. For the safety of all golfers on the course, please do not attempt to drive the blind green from the tee, as doing so may put golfers ahead of you — including players on the 10th green — at risk. Smart course management and patience are especially important on this hole.
18
4
- White: 300
- Red: 200
This large finishing green can make even a routine two-putt for par a challenge if your approach shot isn’t positioned well. Distance control on your approach is key to setting up a manageable first putt. Golfers should also remain mindful of the out-of-bounds running the entire length of the hole along the left side, making accuracy off the tee especially important on your closing hole.
IN
33
- White: 2,034
- Red: 1,582
After your round, relax and celebrate another enjoyable day on the course with a cold beverage, light snack, or meal from the clubhouse. Whether you’re sharing stories from the round or simply taking in the peaceful country atmosphere, we hope your experience at Salt Creek Golf Links leaves you looking forward to your next visit.
TOTAL
65
- White: 4,089
- Red: 3,217
Thank you for visiting Salt Creek Golf Links. Our staff truly appreciates your support and looks forward to welcoming you back again soon for another enjoyable round in the countryside.